Building a Jamstack blog with free Cloudflare hosting and SEO
If you want to go straight to the sample code and skip the tutorial you can find it here. Please feel free to contribute.
Table of Contents
- Introduction
- Creating the project
- Installing the dependencies
- Configuring Nuxt
- Creating the first blog post
- Configuring the RSS feed
- Configuring the sitemap
- Creating the blog post list UI
- Creating the blog post content UI
- GitHub repository
- Configuring hosting with Cloudflare Pages
- Adding SEO to your website
- Adding Dependabot to your repository
Introduction
What is Jamstack?
JAM stands for Javascript, APIs, and Markup. With Jamstack we can have an architecture that delivers a website statically whilst still providing dynamic content through Javascript.
Sometimes we need to build websites that are interactive but do not require a lot of processing of information or complex authentication services. Think of simple sites like a business landing page or a blog site in this case. Since most of the content of these websites won't change too frequently we can deliver the content statically, which means that our website for the most part is going to be pre-generated or pre-rendered by our framework.
Jamstack offers many benefits, from performance to low cost, following this tutorial should be completely free. To get more information about Jamstack you can visit this website.
Framework
The framework or static site generator that we are going to be using for this tutorial is Nuxt 3. This framework will handle the generation of the static files that we will be hosting for our website.
You can explore different options and create your own Jamstack with your preferred framework with this website.
Hosting
Thanks to Cloudflare Pages we can host static sites for free1. You can also configure a custom domain if you have one, but since this tutorial is trying to keep everything free I won't get into that.
Creating the project
Let's start by creating our Nuxt.js project. You'll need to have Node.js v18.0.0 or newer and npm installed on your computer.
Run the following command:
npx [email protected] init davidservn-jamstack-blog-sample
Now run the following command to start the development environment:
npm run dev
If you go to localhost:3000 you should see something like this:
Nuxt welcome page
Installing the dependencies
Let's install the dependencies we are going to need.
Nuxt Content (@nuxt/content)
Nuxt Content will help us manage the blog posts. It is a file-based CMS, which means that our blog posts are going to be written as markdown files on our project and this library will create a pseudo-database with our blog content so that we can fetch the data and create the display for the posts and blog index.
npm install @nuxt/content@^2.12.1
Sitemap (sitemap)
This library will help us with the generation of a sitemap for our website so that it can be indexed by search engines.
npm install sitemap@^8.0.0
Feed (feed)
This library will help us with the creation of an RSS feed for our blog.
npm install feed@^4.2.2
Configuring Nuxt
Now that we have a Nuxt project with the dependencies installed we can start to configure our project.
Let's configure our environment variables:
- Create a file named
.envon the project's root folder. - Add your Base URL variable like this:
BASE_URL=https://davidservn-jamstack-blog-sample.pages.dev
Note: You can use your custom domain or wait for the hosting configuration, Cloudflare Pages will assign a free domain for your project, something like project-name.pages.dev
Open nuxt.config.ts and make sure to have the following configurations:
export default defineNuxtConfig({
  ssr: true,
  modules: ["@nuxt/content"],
  ...
})
Creating the first blog post
Our blog posts are going to live under the content folder. Here we are going to create markdown .md files like this one:
---
title: My first post
summary: This is my first blog post.
createdAt: 2022-01-21 GMT-6
---

## Introduction

Hi this is my first blog post.

Here is a link to my [website](https://davidservn.com/).
The first fields are used as metadata for the nuxt/content library. We can access those fields when fetching the blog posts (we will see that later when creating the UI).
The name of the file will be used as the route, for example: my-first-post.md will be available at base_url/my-first-post.
Creating the blog post list UI
Let's open the app.vue file and add the following code in order to load page components from the pages folder.
<template>
  <div>
    <NuxtPage />
  </div>
</template>
Create a file named pages/index.vue and add the following code to display a simple list with all our blog posts:
<template>
  <div>
    <div class="header">
      <p class="blog-title">DavidServn's Blog</p>
      <p class="rss-p">
        RSS Feed (
        <a target="_blank" href="/feed.xml">XML</a>
        /
        <a target="_blank" href="/feed.json">JSON</a>
        /
        <a target="_blank" href="/feed.atom">ATOM</a>
        )
      </p>
    </div>
    <div id="blog-list">
      <div v-for="post in posts" :key="post._path">
        <article>
          <h1>
            <a class="title" :href="post._path">
              {{ post.title }}
            </a>
          </h1>
          <p class="desc">{{ post.summary }}</p>
        </article>
        <hr />
      </div>
    </div>
  </div>
</template>

<script setup lang="ts">
  const { data: content } = await useAsyncData('index', () => queryContent()
    .only(["_path", "title", "summary"]) // Only fetch the fields that we require to improve performance.
    .sort({ title: 1, createdAt: -1 })
    .find());
  const posts = content.value ?? [];
</script>
We can use the queryContent composable to fetch our blog posts. In this case we use the only() method to only return a small number of fields from each post since we don't need the whole body of our posts and this way we can improve the performance of our blog index.
_path is going to represent the relative URL for our blog post, for example, for my-first-post.md the _path is going to be /my-first-post.
If we go to localhost:3000 we should see how our list looks, it's very simple but you can add some CSS styling to better reflect your personality.
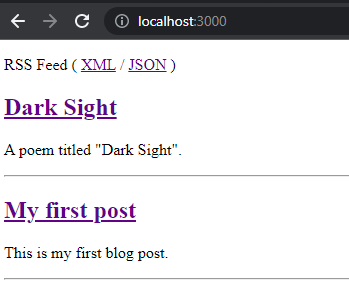
The blog post list
Creating the blog post content UI
Let's create the individual blog post display page. Here we are going to fetch a blog post depending on the URL we are loading (this is why we need the post's _path property) and we will display the post's contents.
We need to create a file named pages/[...slug].vue and add the following code to render the body of our blog post:
<template>
  <div>
    <div class="header">
      <p class="blog-title">DavidServn's Blog</p>
      <p class="rss-p">
        RSS Feed (
        <a target="_blank" href="/feed.xml">XML</a>
        /
        <a target="_blank" href="/feed.json">JSON</a>
        /
        <a target="_blank" href="/feed.atom">ATOM</a>
        )
      </p>
    </div>
    <div id="blog">
      <p class="back">
        <a href="/"><span>Back</span></a>
      </p>
      <article>
        <h1>
          {{ post.title }}
        </h1>
        <ContentRenderer :value="post" />
      </article>
      <br />
      <p class="footer">
        Follow me on
        <a target="_blank" href="https://twitter.com/DavidServn">Twitter</a> to
        be notified about new posts or through RSS (
        <a target="_blank" href="/feed.xml">XML</a> /
        <a target="_blank" href="/feed.json">JSON</a> ).
      </p>
    </div>
  </div>
</template>

<script setup lang="ts">
  let path = useRoute().fullPath;
  if (path[path.length - 1] == '/') {
    path = path.slice(0, -1);
  }

  const { data: content } = await useAsyncData('post', () => queryContent()
    .where({ _path: path })
    .findOne());

  const post = content.value;
  if (!post) {
    throw createError({ status: 404, statusText: "Post not found" });
  }
</script>
We can use the useRoute().fullPath property to read the URL path and fetch the blog post with a matching _path using the where() method.
<ContentRenderer :value="post" /> will load the body of the post into our page. This content is generated by nuxt/content turning our markdown files into HTML code.
If we go to localhost:3000/my-first-post we should be able to see the contents of our content/my-first-post.md file renderized in HTML.
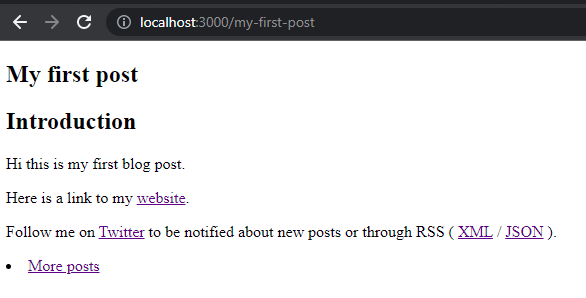
The blog post content
And that's it, you have a functioning blog site with an index and a way to display each blog post with generated routes. Now we can move on to generating our website's sitemap and feed.
Configuring the sitemap
Let's create a file named server/routes/sitemap.xml.ts, here we will use serverQueryContent to access the generated routes for each one of our blog posts and add them to the sitemap routes.
import { serverQueryContent } from '#content/server'
import { SitemapStream, streamToPromise } from 'sitemap'

export default defineEventHandler(async (e) => {
  const baseUrl = process.env.BASE_URL ?? '';

  const content = await serverQueryContent(e)
    .only(['_path'])
    .find();

    const sitemap = new SitemapStream({
    hostname: baseUrl
  })

  // Add nuxt/content routes
  for (const post of content) {
    sitemap.write({
      url: post._path,
      changefreq: 'weekly'
    })
  }

  // Add static routes
  sitemap.write({
    url: baseUrl,
    changefreq: 'weekly'
  })

  sitemap.end()

  setResponseHeader(e, "Content-Type", "application/xml");
  return streamToPromise(sitemap)
})
Open nuxt.config.ts and add the following configurations:
export default defineNuxtConfig({
  nitro: {
    prerender: {
      routes: ['/sitemap.xml'],
    },
  },
  ...
})
The sitemap will be available at base_url/sitemap.xml
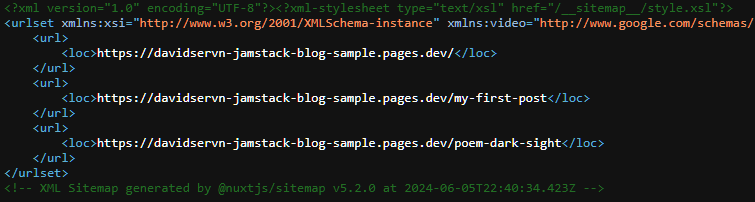
The website's sitemap
Configuring the RSS feed
Let's create a file named server/api/feed.ts, here we will declare a function that uses serverQueryContent to return an RSS feed with the routes for our blog posts.
import type { H3Event } from 'h3'
import { Feed } from 'feed'
import { serverQueryContent } from '#content/server'

export async function getFeed(e: H3Event): Promise<Feed> {
  const baseUrl = process.env.BASE_URL ?? '';

  const content = await serverQueryContent(e)
    .only(['_path', 'title', 'summary', 'createdAt'])
    .find();

  const feed = new Feed({
    id: baseUrl,
    title: "DavidServn's Blog",
    description: "DavidServn's Blog Description",
    link: baseUrl,
    language: "en",
    image: baseUrl + "/images/bg.png",
    favicon: baseUrl + "/favicon-32x32.png",
    copyright: "All rights reserved, David Servin",
    feedLinks: {
      rss: baseUrl + '/feed.xml',
      json: baseUrl + '/feed.json',
      atom: baseUrl + '/feed.atom',
    },
    author: {
      name: "David Servin",
      email: '[email protected]',
      link: 'https://www.davidservn.com/',
    },
  });

  content.forEach((post) => {
    const url = `${baseUrl}${post._path}`;
    feed.addItem({
      title: post.title ?? '',
      id: url,
      link: url,
      description: post.summary,
      date: new Date(post.createdAt),
      image: baseUrl + "/images/blog/meta" + post._path + ".png",
      author: [{
        name: "David Servin",
        email: '[email protected]',
        link: 'https://www.davidservn.com/',
      }],
    })
  });

  return feed;
}
Now let's create the routes for each of the feed files.
server/routes/feed.atom.ts
import { getFeed } from '../api/feed'

export default defineEventHandler(async (e) => {
  setResponseHeader(e, "Content-Type", "application/xml");
  return (await getFeed(e)).atom1();
})
server/routes/feed.json.ts
import { getFeed } from '../api/feed'

export default defineEventHandler(async (e) => {
  setResponseHeader(e, "Content-Type", "application/json");
  return (await getFeed(e)).json1();
})
server/routes/feed.xml.ts
import { getFeed } from '../api/feed'

export default defineEventHandler(async (e) => {
  setResponseHeader(e, "Content-Type", "application/xml");
  return (await getFeed(e)).rss2();
})
Open nuxt.config.ts and add the following configurations:
export default defineNuxtConfig({
  nitro: {
    prerender: {
      routes: ['/sitemap.xml', '/feed.atom', '/feed.json', '/feed.xml'],
    },
  },
  ...
})
The feeds are going to be available at the specified paths base_url/feed.atom base_url/feed.json base_url/feed.xml
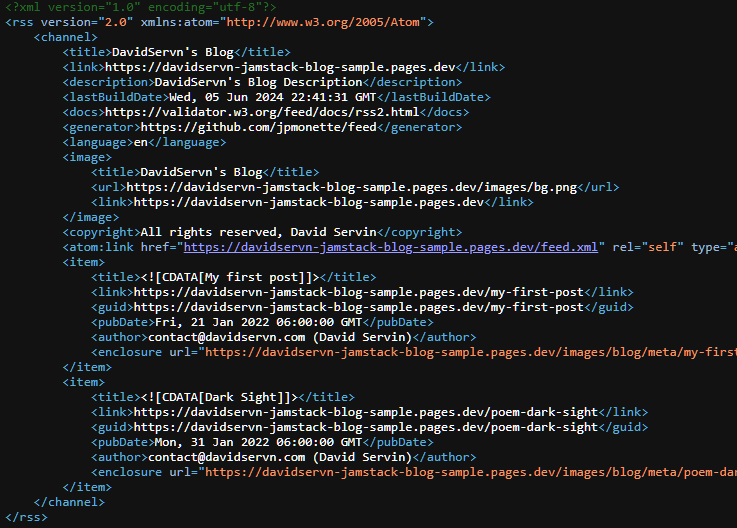
The website's RSS feed
GitHub repository
In order to host our site we will first need to upload our code to a GitHub or GitLab repository in order to connect it with Cloudflare Pages and have our site automatically deployed.
Since every repository is different and we don't need any special configuration I think it's better for you to follow an official guide, here is one for GitHub.
Configuring hosting with Cloudflare Pages
Now we can move on to hosting our site on the internet for free. We can very easily connect our GitHub repository to Cloudflare Pages and whenever we send changes to our main branch our site will be automatically deployed.
- Go to your Cloudflare dashboard.
- Click on
Pages. - Click on
Create a projectandConnect to Git. - Add your GitHub account and select your repository.
- Select
Nuxt.jsunderFramework preset. - Make sure the
Build commandisnuxt generate. - Under
Environment variables (advanced)make sure to add your variables from your.envfile. - Click on
Save and deployand your website will start to build.
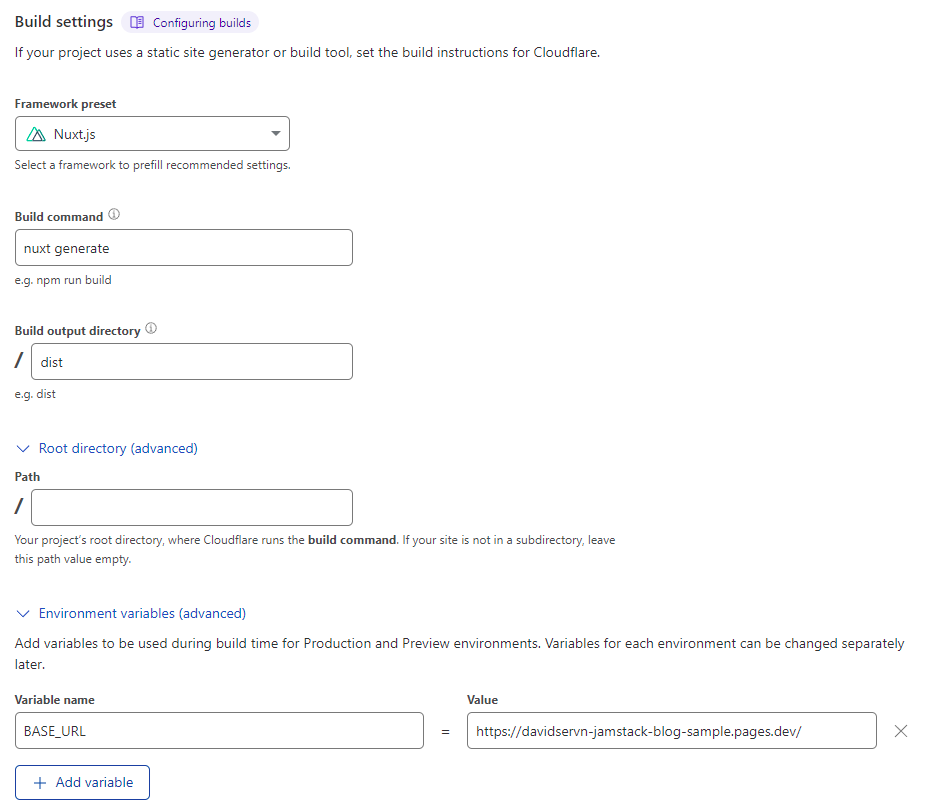
Example of the build configuration
If you forgot to define the environment variables you can configure them like this:
- Go to the
Settingstab of your Cloudflare Pages project. - Click on
Environment variables. - Add the variables from the
.envfile.
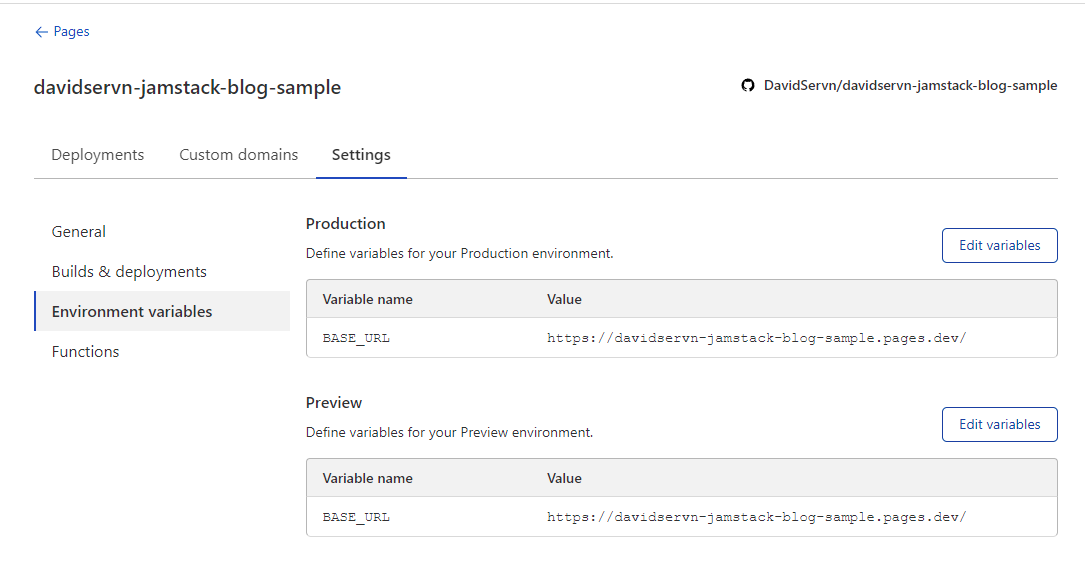
Example of the environment variables configuration
Note: If your deployment fails during npm install you might need to add the following to your package.json:
"optionalDependencies": {
  "@rollup/rollup-linux-x64-gnu": "4.9.5"
}
Once your site successfully builds it should automatically be deployed to the assigned free domain project-name.pages.dev and your site is now live on the internet for free!
Adding SEO to your website
Now that we have a website on the internet we can add some metadata known as SEO in order to improve our online presence and search engine rankings.
There are multiple SEO experts online with different tips and tricks, there's a whole world out there for you to explore. To keep this brief I'll only show you the bare minimum to get you started.
robots.txt
This file will help with the discoverability of your site by search engine crawlers.
Create a file named robots.txt inside the static folder with the following content:
User-agent: *
Disallow:
Open Graph tags
Open Graph tags make your site pop more when it is linked on social media. Think of those posts on Facebook or Twitter that shows you a linked website with an image and a headline.
Open nuxt.config.ts and add the following metadata with your website's information:
export default defineNuxtConfig({
  app: {
    // https://nuxt.com/docs/getting-started/seo-meta
    head: {
      title: "DavidServn's Blog",
      htmlAttrs: {
        lang: "en",
      },
      meta: [
        { charset: "utf-8" },
        {
          name: "viewport",
          content: "width=device-width, initial-scale=1, user-scalable=no",
        },
        {
          hid: "robots",
          name: "robots",
          content: "index,follow",
        },
        {
          hid: "googlebot",
          name: "googlebot",
          content: "index,follow",
        },
        {
          hid: "description",
          name: "description",
          content: "This is my blog.",
        },
        { hid: "og:title", name: "og:title", content: "DavidServn's Blog" },
        {
          hid: "og:description",
          name: "og:description",
          content: "This is my blog.",
        },
        { hid: "og:url", name: "og:url", content: process.env.BASE_URL },
        { hid: "og:type", name: "og:type", content: "website" },
        {
          hid: "og:image",
          name: "og:image",
          content: process.env.BASE_URL + "/images/bg.png",
        },
        {
          hid: "og:image:alt",
          name: "og:image:alt",
          content: "DavidServn's Blog",
        },
        { hid: "og:image:width", name: "og:image:width", content: "2449" },
        { hid: "og:image:height", name: "og:image:height", content: "1632" },
        {
          hid: "twitter:card",
          name: "twitter:card",
          content: "summary_large_image",
        },
        { hid: "twitter:site", name: "twitter:site", content: "@davidservn" },
        {
          hid: "twitter:creator",
          name: "twitter:creator",
          content: "@davidservn",
        },
        {
          hid: "theme-color",
          name: "theme-color",
          content: "#1b1f22",
        },
      ],
      link: [
        {
          hid: "canonical",
          rel: "canonical",
          href: process.env.BASE_URL,
        },
        { rel: "icon", type: "image/x-icon", href: "/favicon.ico" },
      ],
    },
  },
})
You can go to this site to test your Open Graph tags. Add the URL of your site and the information of your website should appear on the preview.
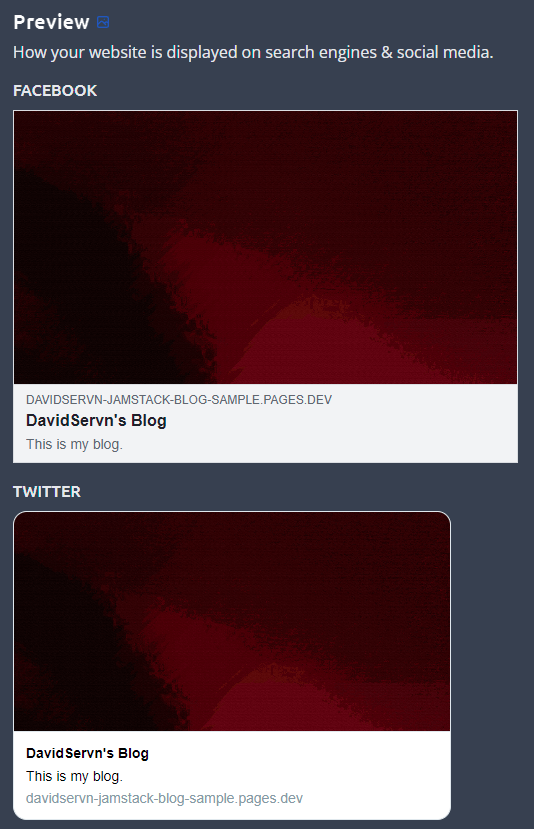
Example of Open Graph meta tags for the blog site
We have added the general information of our site but we should override that information when we link a blog post directly with its own information.
We first need to add our environmental variables to the client-side rendering. We need to open nuxt.config.ts and add the following configuration:
export default defineNuxtConfig({
  runtimeConfig: {
    public: {
      BASE_URL: process.env.BASE_URL
    }
  },
  ...
})
Since we have a page for displaying the post's content we only need to open pages/[...slug].vue and add the following metadata:
<script setup lang="ts">
  const config = useRuntimeConfig()

  useHead({
    title: post.title,
    meta: [
      {
        hid: "og:title",
        name: "og:title",
        content: post.title
      },
      {
        hid: "og:image:alt",
        name: "og:image:alt",
        content: post.title,
      },
      {
        hid: "description",
        name: "description",
        content: post.summary,
      },
      {
        hid: "og:description",
        name: "og:description",
        content: post.summary,
      },
      {
        hid: "og:url",
        name: "og:url",
        content: config.public.BASE_URL + post._path,
      },
      {
        hid: "og:type",
        name: "og:type",
        content: "article",
      },
      {
        hid: "article:published_time",
        name: "article:published_time",
        content: post.createdAt,
      },
      {
        hid: "og:image",
        name: "og:image",
        content: config.public.BASE_URL + "/images/blog/meta/" + post.slug + ".png",
      },
      {
        hid: "og:image:width",
        name: "og:image:width",
        content: "1350",
      },
      {
        hid: "og:image:height",
        name: "og:image:height",
        content: "900",
      },
    ],
    link: [
      {
        hid: "canonical",
        rel: "canonical",
        href: config.public.BASE_URL + post._path,
      },
    ],
  });
  ...
</script>
If you need more data per post you can add custom fields in the header of the content markdown files like this:
---
myCustomField: Hello
---
And we are able to access that field on the pages/_.vue file like this post.myCustomField.
If we now load a URL of a blog post like https://davidservn-jamstack-blog-sample.pages.dev/poem-dark-sight we should see the post's information on the preview.
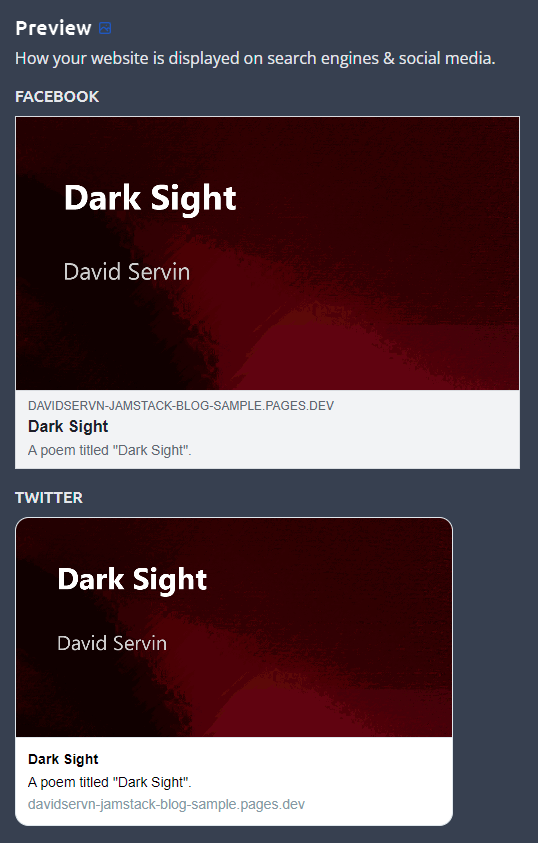
Example of Open Graph meta tags for an individual blog post
Adding Dependabot to your repository
Dependabot is a very useful GitHub bot that will automatically create pull requests for your project whenever a dependency receives an update. This will ensure that your project is always up to date.
If you want to configure dependabot for your project you'll need to create a folder called .github on the root of your project and inside create the following dependabot.yml file:
version: 2
updates:
  # Fetch and update latest `npm` packages
  - package-ecosystem: npm
    directory: '/'
    schedule:
      interval: monthly
      time: '00:00'
    open-pull-requests-limit: 10
    reviewers:
      - YOUR_GITHUB_USERNAME_HERE
    assignees:
      - YOUR_GITHUB_USERNAME_HERE
    commit-message:
      prefix: fix
      prefix-development: chore
      include: scope
Note: Make sure to replace YOUR_GITHUB_USERNAME_HERE with your GitHub username.
Footnotes
- Please consult the pricing for more accurate information https://pages.cloudflare.com/#pricing. ↩